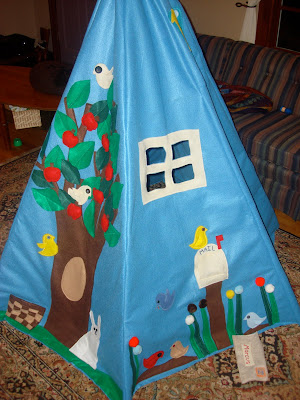
The teepee playhouse is complete! Hooray! I am still flabbergasted that it actually came out the way I envisioned it. I finished sewing it together on Sunday and not only did my wonderful husband go out to Home Depot to buy the poles the very next day, but he also drilled the holes in them and sanded them that evening!

Here it is - in all of its teepee playhouse glory! The front doors are fastened with velcro for easy entrance and exit.

The birdhouse and the scarecrow don't even appear as crooked as they actually are!

Mail has already gone in and out of the mailbox several times.

Oh, and here is a close-up of our little bunny friend. I am so proud of my embroidery work on his face - I'm getting much better! I could tell you that I ended up omitting the bunny tail because of a design choice, but I will be truthful and admit that I was just plain tired and got a little bit lazy towards the end. This bunny is sitting on his tail, and that is that!

This might be my favorite part of the teepee - look at it fold up! When our older son transitions from his toddler bed to a twin bed, this teepee will just slide right under the bed! Yes! For now, we'll just see how long my husband lets me keep it right there in the living room.

So, there are flaws that I need to fix. The biggest one is the windows. I should have made them lower because their design just begs for peek-a-boo games, and the boys end up hanging on the frames. If this keeps up, the windows will eventually tear. So, I'll need sew some mesh onto the windows (using a mesh laundry bag). Bummer, but better to be preventative.

Now, you might wonder why I just don't teach my children not to hang on the window frames. Well, this is why! Big Brother could probably handle that, but Little Brother is a total maniac. Can't you see that mischievous smile hiding behind his pacifier?

A slightly annoyed model wants me to finish up with the picture taking. But, here you can see that the space inside is big enough even for a bean bag!

Look at how commodious this space is - it is almost as big as our whole house (just kidding, but not really). It is definitely roomy enough for three children to fit inside (insert my mischievous smile here).

The other part I wish I had done differently is the length of the flower stems. They are just too darn long, which causes them to be floppy and awkward when "planted". We've been bending the stems when putting them back into the soil, but I think I might redo some of these - especially because I wasn't super happy with how messy some of them looked anyways.

The boys were quick to harvest all of the fruits and vegetables and piled up their bounty onto the couch.

How did I put this together? Well, first of all I used a teepee pattern (Butterick 4251). And, of course, the idea and many pieces were modeled after this. The pattern called for the use of PVC pipes, but I thought that was ridiculous since PVC is not something children should be coming into daily contact with! So, we used 84" length 3/4" x 3/4" square wooden dowels (purchased from Home Depot). When sewing the panels together, I first laid the panels wrong sides together and sewed up one side with a 1/2" seam allowance. Then I flipped the two panels over so that they were laying right sides together and sewed up the same side with a 2" seam allowance. This created a casing for each pole to slide into. The top of each panel was hemmed to form a casing for a cord to run through. Cinching the cord kept the teepee panels from falling down. Each of the wooden poles has a hole drilled through it, about 12" from the tops. Then a cord is threaded through the holes with a wooden bead separating each pole (this helps the teepee keep its shape). The pattern is a good one - pretty easy! Any local sewers are welcome to borrow mine.

Like I said, after looking at this (!) laid out the night before I started sewing the panels together, I wasn't sure it was actually going to work out. I thought it would be monstrous and too heavy to stand up! But, instead I am absolutely thrilled with my product! What a project!

And this is what my sewing table looks like now. Yikes. I think I have to tackle this project before starting any new ones.


Excellent work Shelly! Anna will be excited when she sees it and maybe will let me sew! Of course, it's not really her that's the problem....
ReplyDeleteShelly, I know this took a lot of work but if you could figure out a way to produce these, I bet folks would line up to buy them. Awesome job!!! I love it.
ReplyDeleteAdorable! I agree about the windows, I need to add mesh or plastic to the ones that I didn't originally, I hate having to say "only go in through the door please!" :) Thanks for participating in We Did It! Wednesday at Sew Much Ado!
ReplyDeleteThis looks amazing!
ReplyDeleteIm just about to start the butterwick teepee so fingers crossed!
http://teepeedreams.blogspot.co.uk/