Showing posts with label tutorial. Show all posts

March 21, 2013

easy spring cowl

A sweet friend of mine requested a tutorial on infinity scarves. There are a few different ways to make them, but I find this way the easiest. And this one I'm calling a cowl - because it doesn't loop twice. Looping twice makes it an infinity scarf to me. I don't know my definitions are accurate, but those are the facts over here on my blog, folks!


My goal was to make a lightweight cowl to add some interest to my extensive array of solid color tees (this is what I call my spring wardrobe).  The fabric is Robert Kaufman London Calling 3: Celebration. It has an amazingly breezy feel, and the print is just adorable. I bought it at Pacific Fabrics, and all of the lovely women there were doting over it. Anyways, here's the tutorial...


 1. Take your 1/3 yard of fabric, fold right sides together with selvages on ends. Measure out 25" and cut. This is perfect to fit over my 22" head (now you know where my children get their big heads from). You can shorten or lengthen as desired.


2. Pin the long side of the fabric together. 


3. Sew the long edge with 1/2" seam allowance.


4. Press seam flat.


5. Turn cowl right side out. Then line up short ends, right sides together (my photo shows this step in process - does that make sense?)


6. Pin ends together, leaving a 2" or so gap for turning.


7. Sew all the way around using a 1/2" seam allowance, and minding the gap!


8. Turn cowl right side out. Press gap closed and pin.


9. Top stitch gap closed about 1/8" from the edge.


You could also blind stitch the gap closed, but that takes a really long time and you can't really see the topstitches when the cowl is worn, anyways. Sometimes laziness pays off.


Ridiculous picture of me wearing cute cowl. I need some *serious* help with self-photography if I'm going to keep making scarves. I took this one in the mirror with the camera on top of my head. Or I need a model. Any volunteers?


So, this tutorial also works if you want to make a Survivor buff knockoff. Because that is basically what it is. I can't rock the buff any other way than around my neck, but I bet some of you could. Just think of the possibilities if you were to use jersey!

Still working on the site and the shop. I will probably be moving to wordpress.org soon. Thanks for you patience with me!

:) Shelly

July 19, 2010

silly little project

So, no... this is not the very exciting project I promised to unveil to you. To be quite honest, that project isn't going so well at the moment. I'm hoping to work on it a bit more tonight and improve things before I share it. Or maybe I'll watch a movie and deal with it tomorrow. At any rate, I did complete a project a couple of days ago that kind of borders on ridiculous.

"Huh? What is that?" Well, you see, the little hook on my key remote thingy for Chris' car broke, which means that it can no longer hang on the key chain. So, I needed to make a little pouch in which to keep it with my keys.

See where it is broken? You know, at the risk of sounding like an 80 year-old man here, they just don't make things like they used to! I am very careful with my things, and they are breaking all the time. This is especially true of my Toyota things - the other night Chris poked his finger at the dash board of my car in order to wipe the dust away from the clock window, and he pushed the clock right into it! Now I have a hole in my dashboard where my clock used to be. It is not like Chris has some kind of bionic finger strength. Arghhh! Anyways, I digress. Back to the little pouch.

Okay, now here is the silliest part of this project: I actually made a tutorial of it. You know, in case this unfortunate incident ever happens to you and you are faced with either paying $40 (plus a programming fee) for a new remote or solving the problem yourself? Well, anyways, here goes the tutorial. First I cut two 3"x5" rectangles and two 3"x3.5" rectangles.

Then I took the 3"x5" rectangles (wrong sides together) and made two marks about 3/4" from each side.

Next I laid the 3"x3.5" pieces on top of the 3"x5" pieces, matching them up at the bottom and sides. At that 3/4" mark, I cut down 2" until I met the smaller rectangle piece, then cut over 3/4". I did the same for the other side. This made the closure of my pouch.

Next I stitched my pieces with the pouch enclosure together (right sides together) and stitched my small rectangle together (right sides together), leaving the bottom open. I used 1/3" seam allowance for all sewing.

When I turned them right-side-out, they looked like this.

I laid these two pieces with right sides together and sewed them at the bottom. Here I used about at 1/2" seam allowance, then later trimmed the seam for neatness.

I attached a small square of velcro to the top of the closure (on the "wrong" side or inside of the pouch).

Then I attached a matching square of velcro to the outside of the pouch, being careful to leave room for the remote to fit inside and the closure to loop over my key chain.

Finally, I sewed up the sides (with right sides together), and turned the pouch right-side-out.

The key remote fit right inside, all nice and snug.

And, now it hangs on my key hook, ready to be used. I don't have to look all over for this little sucker or dig around in the bottom of my bag for it anymore! I struggled with the velcro vs. button decision for a few minutes while making this little pouch. A velcro closure guarantees ease when retrieving the remote, whereas a button increases security of the pouch staying on the key chain. Hmmm... choices. In the end, I went for ease of use, which means I will probably end up loosing it (oh, well).

But, for now I saved myself 40+ bucks! And, now you have this lovely tutorial to make a keychain pouch for anything - bus pass, cash, lip balm, what-have-you!

April 8, 2010

Weather Wheel

Today was the perfect day for Charlie and I to finish up our Weather Wheel because it rained, hailed, and shined today - and the makings of a rainbow just might be in the works!

Isn't it cute? By the way, I totally stole this idea from my friend, Karen.

This is Karen's Weather Wheel. Her pictures are so much cuter than mine - especially the way she depicted the wind. And, the little umbrella is utterly darling. Karen got this idea from a book that she owns, The Complete Resource Book for Toddler and Twos by Pam Schiller. So I guess Karen and I both stole it.

Now I bet you'd like to make one yourself! It is the perfect no-sew, easy project for little hands. Here's how you do it:

Materials Needed
*multiple colors of felt
*cardboard circle from frozen or take-and-bake pizza
*small piece of heavy-weight paper (like a manilla file folder)
*Sharpie marker
*lots-o-glue
*ribbon
*embroidery or other large needle
*brass brad (is that how you spell it?)

First you draw out eight different pictures of weather conditions using your Sharpie and felt. You can cut them out very precisely as Karen beautifully did, or less attractively like I did (laziness). I made these after my boys were in bed (and while I was watching a ridiculous amount of HGTV). Charlie is kind of crazy when it comes to Sharpie markers; we've had some really close calls. So I decided to do this portion on my own, but if you have an older, Sharpie-responsible child, this would be a great little activity to do together! Imagine how sweet child-drawn weather conditions would be!

Then use your Sharpie and felt to make labels for each of your weather conditions and cut them out.
Next use your cardboard pizza circle and Sharpie to trace a circle of felt, then cut the felt circle out.

Divide the felt circle into eight pie-piece sections. I am very aware that mine looks like a basketball. This is because Charlie's favorite color is orange, and also because of the suspected brain damage I sustained from being subjected to an insane amount of NCAA basketball tournament games over the past three weeks. I seriously need to take up knitting - otherwise I have no idea how I will survive sports seasons with three males in the house.

And next is GLUE! Cover the cardboard pizza circle with Elmer's Glue All (not the school glue - Karen says that doesn't work so well).

Then smooth the felt basketball onto the top of the glued circle.

Now's the fun part - glueing all of the weather pictures onto the board. You need to really glue them - I'm talking LOTS of glue. Felt on felt requires a three-year-old's idea of enough glue.

When you think you've put enough glue onto each felt piece, go ahead and put some more glue on them. Then smoosh each piece down onto the board. If the glue goes through the felt weather picture and gets your hand wet, then you know you've applied just enough glue.

A matching game - this just keeps getting better! Ask your child to match each label to its corresponding weather condition picture. Then glue those puppies down, too.

Ta-da! Almost done!

Make an arrow out of tagboard (I used a manilla file folder) and trace it onto some felt. Cut your felt arrow out and glue it to your tagboard arrow. Let dry. Then use an embroidery needle to poke a hole through the end of the arrow.

Use the embroidery needle to poke another hole through the center of the weather board and near the top of the board. Thread a ribbon through the needle and pull it through the top of the board hole. Knot the ribbon. Then use your brass brad (mine is a star - so cute from A Muse, which is a fabulous paper/card store I just discovered) to attach the arrow to the center of the weather board.
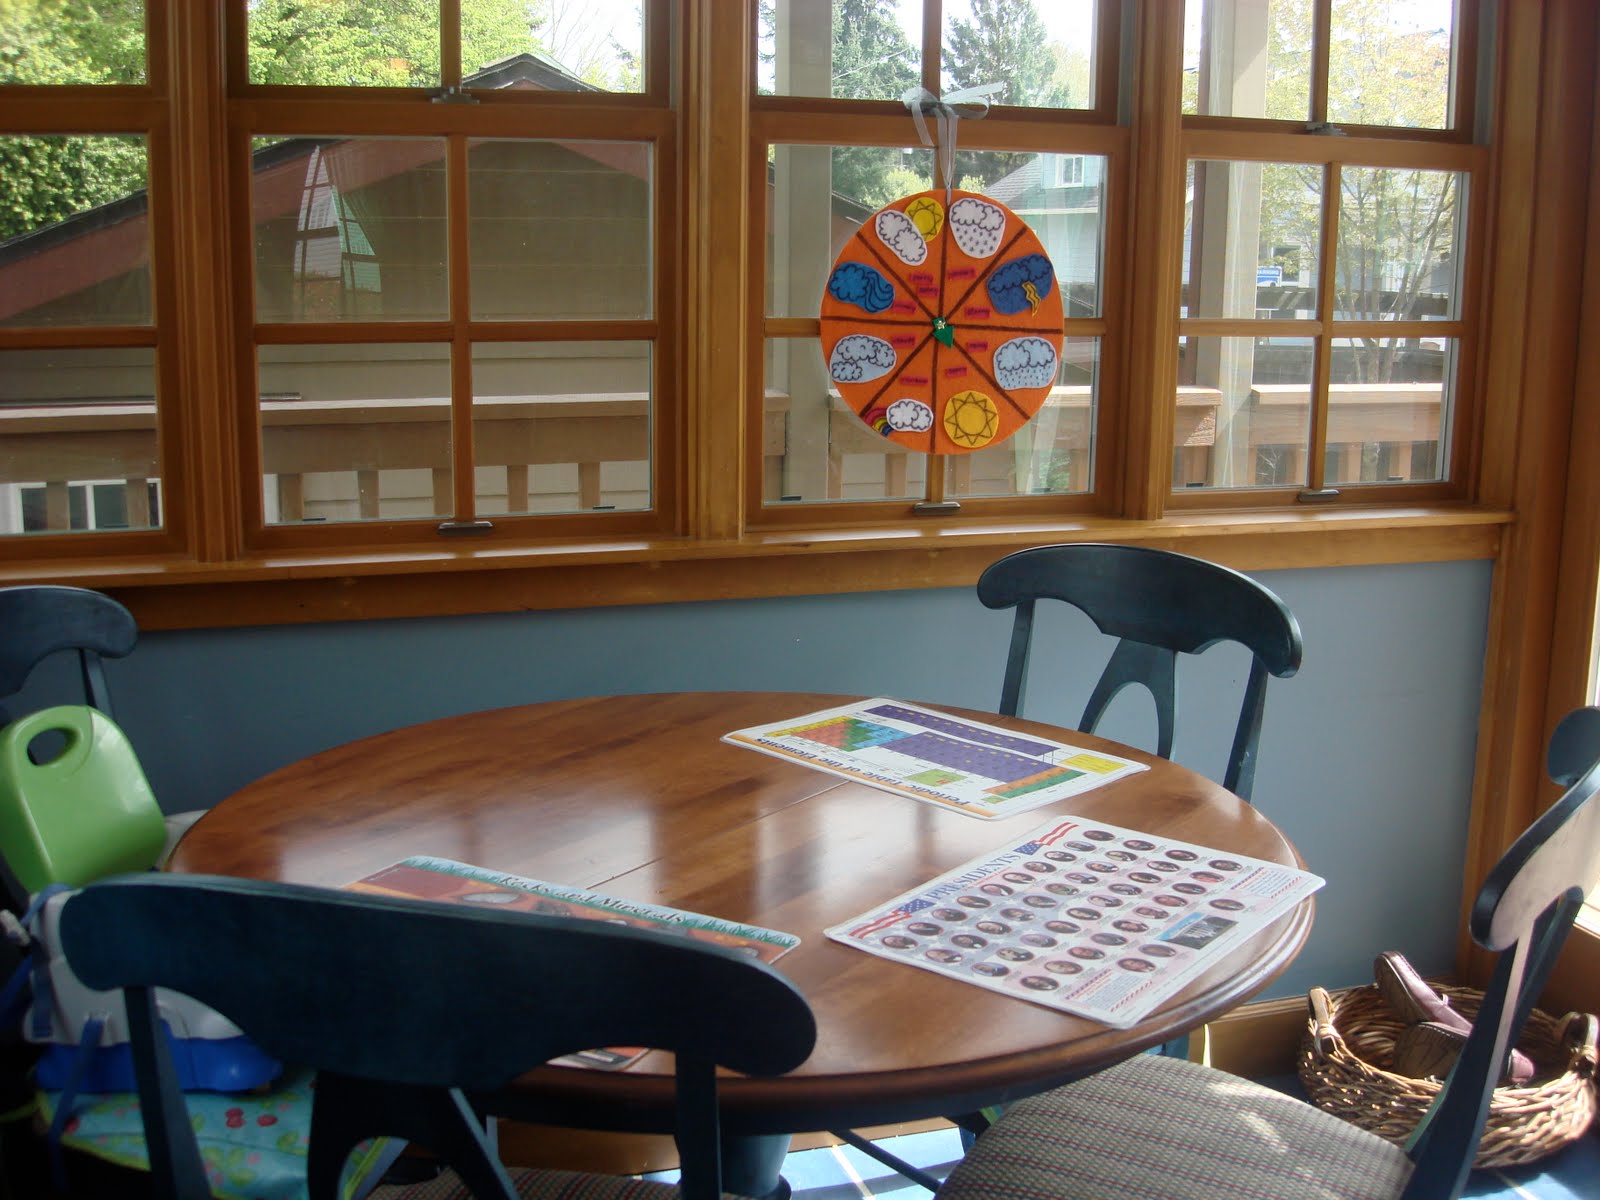
Finally, hang your Weather Wheel up! I hung mine right above Charlie's chair at our kitchen table. I'm sure Marcus will appreciate it, too - but he's at the stage right now where he'll just smear his mac-n-cheese fingers all over it if it is hung within his reach. Charlie is super excited about his Weather Wheel. I am super excited about the science geekiness he is beginning to embrace - check out his current favorite placemat: the periodic table of elements! Those geeky science kids always end up being the coolest adults - I should know, I married one.

Have fun making your Weather Wheel! And I hope you arrow points to "sunny" more often than not!

The Girl CreativeGet your craft on Thurs.

April 1, 2010

Scrappy the Corduroy Dog

How is it that Easter is already this Sunday?! Luckily (ha!) I've been suffering from a little insomnia lately, so I managed to make a little something for Marcus' Easter basket last night...


Woof! Woof!

Unlike his big brother (who is OBSESSED with all things vehicular), Marcus is a serious animal lover. He especially adores dogs. I was planning on making both of the boys this cozy car caddy from Homemade by Jill, but then I realized that it wouldn't be very age appropriate for Marcus. The only thing he really does with Matchbox cars is try to bite the wheels off.


So, I decided to make him a little pup to cuddle up with. This is my very pathetic looking pattern.


I used a scrap of corduroy, some ribbon for the collar and some soft, velveteen brown fabric I had leftover for the paws, ears, and tail.


I trimmed up the paws and folded the top over, then basted them onto the dog's legs. I also stitched the skinny tail together and turned it right-side-out (with a wooden skewer because it was so skinny and slippery!).


I sewed the ears together, turned them out, then sewed them onto the top of the dog's head. I sewed the tail onto his bum and stitched the ribbon onto his neck. Then I put wrong sides together and sewed all the way around, taking care to tuck the ears up so that I didn't get them caught in my stitching. I left his tummy open for stuffing. After turning my puppy pal right-side-out, I stuffed him with polyfill, then stitched him up. I decided to top stitch around him for better shape and durability, but I probably should have done this before stuffing him because it was super difficult to do while he was all puffed up!

Sorry for the lack of photos in this poor excuse for a tutorial; I kept forgetting to take pictures while I was working on this canine masterpiece. I think Marcus will like his new little pal, though. Sometimes kids need different gifts - I just hope that Charlie doesn't like Marcus' Easter present better than his own!