Showing posts with label felt playhouse teepee. Show all posts

February 16, 2010

Teepee Sweet Teepee

The teepee playhouse is complete! Hooray! I am still flabbergasted that it actually came out the way I envisioned it. I finished sewing it together on Sunday and not only did my wonderful husband go out to Home Depot to buy the poles the very next day, but he also drilled the holes in them and sanded them that evening!


Here it is - in all of its teepee playhouse glory! The front doors are fastened with velcro for easy entrance and exit.


The birdhouse and the scarecrow don't even appear as crooked as they actually are!
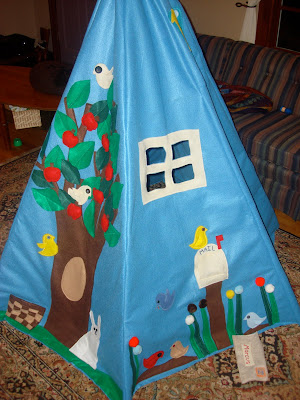

Mail has already gone in and out of the mailbox several times.


Oh, and here is a close-up of our little bunny friend. I am so proud of my embroidery work on his face - I'm getting much better! I could tell you that I ended up omitting the bunny tail because of a design choice, but I will be truthful and admit that I was just plain tired and got a little bit lazy towards the end. This bunny is sitting on his tail, and that is that!


This might be my favorite part of the teepee - look at it fold up! When our older son transitions from his toddler bed to a twin bed, this teepee will just slide right under the bed! Yes! For now, we'll just see how long my husband lets me keep it right there in the living room.


So, there are flaws that I need to fix. The biggest one is the windows. I should have made them lower because their design just begs for peek-a-boo games, and the boys end up hanging on the frames. If this keeps up, the windows will eventually tear. So, I'll need sew some mesh onto the windows (using a mesh laundry bag). Bummer, but better to be preventative.


Now, you might wonder why I just don't teach my children not to hang on the window frames. Well, this is why! Big Brother could probably handle that, but Little Brother is a total maniac. Can't you see that mischievous smile hiding behind his pacifier?


A slightly annoyed model wants me to finish up with the picture taking. But, here you can see that the space inside is big enough even for a bean bag!


Look at how commodious this space is - it is almost as big as our whole house (just kidding, but not really). It is definitely roomy enough for three children to fit inside (insert my mischievous smile here).


The other part I wish I had done differently is the length of the flower stems. They are just too darn long, which causes them to be floppy and awkward when "planted". We've been bending the stems when putting them back into the soil, but I think I might redo some of these - especially because I wasn't super happy with how messy some of them looked anyways.


The boys were quick to harvest all of the fruits and vegetables and piled up their bounty onto the couch.


How did I put this together? Well, first of all I used a teepee pattern (Butterick 4251). And, of course, the idea and many pieces were modeled after this. The pattern called for the use of PVC pipes, but I thought that was ridiculous since PVC is not something children should be coming into daily contact with! So, we used 84" length 3/4" x 3/4" square wooden dowels (purchased from Home Depot). When sewing the panels together, I first laid the panels wrong sides together and sewed up one side with a 1/2" seam allowance. Then I flipped the two panels over so that they were laying right sides together and sewed up the same side with a 2" seam allowance. This created a casing for each pole to slide into. The top of each panel was hemmed to form a casing for a cord to run through. Cinching the cord kept the teepee panels from falling down. Each of the wooden poles has a hole drilled through it, about 12" from the tops. Then a cord is threaded through the holes with a wooden bead separating each pole (this helps the teepee keep its shape). The pattern is a good one - pretty easy! Any local sewers are welcome to borrow mine.


Like I said, after looking at this (!) laid out the night before I started sewing the panels together, I wasn't sure it was actually going to work out. I thought it would be monstrous and too heavy to stand up! But, instead I am absolutely thrilled with my product! What a project!


And this is what my sewing table looks like now. Yikes. I think I have to tackle this project before starting any new ones.


February 9, 2010

Teepee Tedium

In case you were wondering... Yes, I am still working on the teepee! I anticipated this last panel taking a long time to complete (which is why I saved it for last). I'm not finished with it yet, but thought I'd post what I have so far.


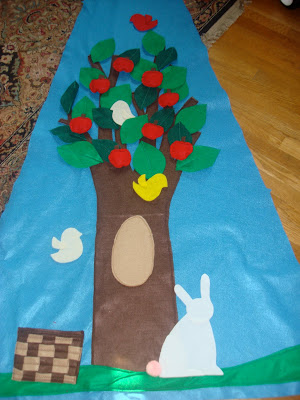
The apples are affixed to the tree with velcro, so they can be "picked" even by my short little boys.


Each apple picked can be placed in this little basket. I love the basket - it came out so much better than I imagined. I wove the felt strips and sewed them onto another piece of felt, the used some decorative stitching to hold it all together
.

I cut the last few pieces out - some birds and a bunny. I was so excited about the bunny tail - I was planning to use one of the little puff balls that I used for the flowers on the first panel. Then I realized that I used up all the white puffs when I did the flowers! Drat! Now I have to take apart one of the white flowers and replace it with a pink puff ball so that my rabbit has a tail. Of course there will be button eyes to sew on the birds and some embroidery to give the bunny a happy face.

I've discovered that posting an anticipated timeline for finishing this project is an exercise in futility. Just because I write it doesn't mean it will even come close to happening. So, I will just say this: I will finish this teepee soon. I promise!

February 2, 2010

Teepee Playhouse Progress!

Wow. This last panel seemed to take me an awful long time to complete. I am totally obsessed with the design and layout process of this project, but I think I may be losing some steam on the sewing parts. This does not bode well for me as I near the assembly portion of the teepee project. I'm hoping to finish this weekend, but that darn Superbowl is Sunday. Rats!


At first I had only the turnips and red onion in the garden. There was entirely too much open space, and the garden was begging for something tall. With little room for a tall crop like corn, I came up with the scarecrow. When my older son saw it he said, "Ooooh. A scarecrow. He's scary." Not exactly what I was going for.


The red onions are really purple, but they are still fun to pick. Don't eat one, though - it will taste like polyfill if you do.


The turnips were made with the same carrot pattern from my last panel. These turned out much better because I sewed them from the bottom up and attached the tops last. These are the expensive organic turnips you get from Whole Foods, and the carrots are the waterlogged ones that sit on the produce display for weeks at Safeway.


Big-eye birdie. I've officially run out of buttons. The white stitching came about out of pure laziness - I didn't feel like changing the thread AGAIN. But, it ended up making this little guy stand out a lot more against the light blue background. So, it was a win-win!


"If I only had a brain..."


I've gotten quite a bit better with the embroidery floss since my last trial ("MAIL" on the mailbox). I'm still struggling with it, though.


Speaking of mail... check out the FABULOUS mail that Anna made for the teepee. This mail was actually what jump-started my progress on the teepee. Admire Anna's near-perfect embroidery skills. She will be a frequently featured guest sewer on this blog, as she is the creator of many super cute projects.


While I was finishing up the scarecrow's face, my older son woke up from his nap. I was talking with him while my eyes were glued on my project-in-hand, and then I discovered that he was helping me "organize" my embroidery floss. Arghhh.


Don't worry... while I was photographing the panel he got the red floss, too. No embroidery floss left untangled!

The last panel is in the works! Hooray!

January 30, 2010

Playhouse Teepee

So this is my first official sewing post. And, it seems appropriate that I start with a seriously huge project that is taking me forever to complete. I'm pretty happy with how it's coming along so far, though. I got the idea for this playhouse here. However, we do not have room in our tiny house to stash away a card table, so I came up with the idea of making it as a teepee that can be collapsed and stashed under a twin bed (or so the idea goes in my head). Here's my progress thus far:


This was my first attempt at the first panel. Enthusiasm for the project plummeted quickly after spending an obscene amount of time thinking, cutting, and pinning, then ending up with this. I decided that the circular window looked ridiculous and the birds definitely needed something to land on. And those huge blades of grass looked more like weeds that had yet to meet a weed-wacker (much like most of our yard).


So, I added more grass, transformed them into flowers with fuzz ball blooms, added a couple of birds and gave them some dirt. Plus, I changed that circular window to a more traditional rectangle. Much better. I am still not super happy with my embroidery work on the word "MAIL". This was my first time working with embroidery floss, though - so I decided to cut myself a little slack.


I think this is still my favorite pair of birds.


This section will go right above the door flaps. Do the hearts make it too girlie?


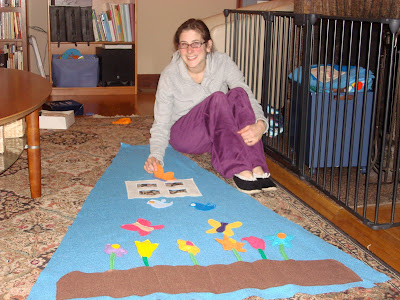
The second panel was a lot of fun to make. The flowers are made with felt, pipe cleaner, and polyfill. They are bendy, puffy, and my older son's favorite part of the teepee so far. He has already "picked" the flowers many times.


I plan to make a few more flowers, especially since my first few are a bit messy. I seemed to master the process by the final flower - isn't that always the way?!


The birds' wings are only stitched across the top, so they flap out a little bit (which is difficult to see in 2D). This was purely a result of my laziness in stitching, and it ended up being one of my favorite birdie features.


I really liked how this butterfly turned out, but I wish I had used darker thread for the antennae.


I have been working on this project into the wee hours. Here I am in my jammies, bleary eyed and almost delirious after a few hours at my sewing machine. These children better appreciate this thing or I am going to keep it all for myself!


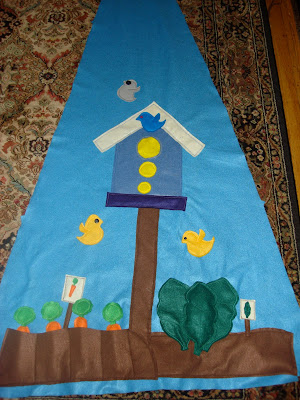
The third panel came out okay. Note that the bird house is crooked. I thought about ripping the house out and re-sewing it straight, but then I decided to embrace the charm of the imperfection and move on. I also screwed up the roof line of the birdhouse, but cleverly hid my mistake with a birdie friend.


The carrots are ready for harvest!


A very puffy leaf of spinach looks delicious! My favorite parts, the little crop signs, were actually an afterthought. I like that it makes it kind of a matching game to put the correct veggies in the matching spot in the garden.


I still need to make some stuffed birdies to go into the pocket of the birdhouse. I've run out of buttons, though. Now, that will be a fun shopping trip!


And here it is, all laid out in our tiny living room. So, there is a 2 inch seam allowance on each side, and the bottom will be hemmed (with scissors - gotta love felt!) up to the soil. So, the teepee will actually be a lot smaller than it looks here. It should comfortably fit two children inside. I think it might even fit three if I can talk my husband into having a third!

I'm almost finished cutting and pinning my fourth panel! Then I just have one more before teepee assembly begins! Stay tuned...