So this is my first official sewing post. And, it seems appropriate that I start with a seriously huge project that is taking me forever to complete. I'm pretty happy with how it's coming along so far, though. I got the idea for this playhouse here. However, we do not have room in our tiny house to stash away a card table, so I came up with the idea of making it as a teepee that can be collapsed and stashed under a twin bed (or so the idea goes in my head). Here's my progress thus far:

This was my first attempt at the first panel. Enthusiasm for the project plummeted quickly after spending an obscene amount of time thinking, cutting, and pinning, then ending up with this. I decided that the circular window looked ridiculous and the birds definitely needed something to land on. And those huge blades of grass looked more like weeds that had yet to meet a weed-wacker (much like most of our yard).

So, I added more grass, transformed them into flowers with fuzz ball blooms, added a couple of birds and gave them some dirt. Plus, I changed that circular window to a more traditional rectangle. Much better. I am still not super happy with my embroidery work on the word "MAIL". This was my first time working with embroidery floss, though - so I decided to cut myself a little slack.

I think this is still my favorite pair of birds.

This section will go right above the door flaps. Do the hearts make it too girlie?

The second panel was a lot of fun to make. The flowers are made with felt, pipe cleaner, and polyfill. They are bendy, puffy, and my older son's favorite part of the teepee so far. He has already "picked" the flowers many times.

I plan to make a few more flowers, especially since my first few are a bit messy. I seemed to master the process by the final flower - isn't that always the way?!

The birds' wings are only stitched across the top, so they flap out a little bit (which is difficult to see in 2D). This was purely a result of my laziness in stitching, and it ended up being one of my favorite birdie features.

I really liked how this butterfly turned out, but I wish I had used darker thread for the antennae.

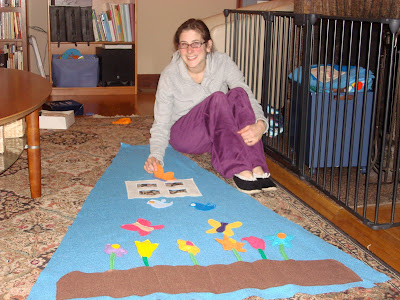
I have been working on this project into the wee hours. Here I am in my jammies, bleary eyed and almost delirious after a few hours at my sewing machine. These children better appreciate this thing or I am going to keep it all for myself!

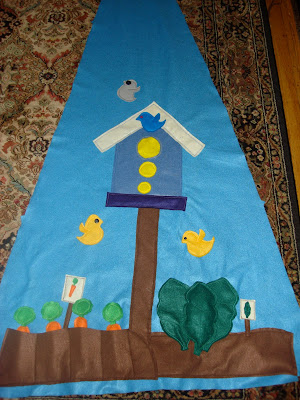
The third panel came out okay. Note that the bird house is crooked. I thought about ripping the house out and re-sewing it straight, but then I decided to embrace the charm of the imperfection and move on. I also screwed up the roof line of the birdhouse, but cleverly hid my mistake with a birdie friend.

The carrots are ready for harvest!

A very puffy leaf of spinach looks delicious! My favorite parts, the little crop signs, were actually an afterthought. I like that it makes it kind of a matching game to put the correct veggies in the matching spot in the garden.

I still need to make some stuffed birdies to go into the pocket of the birdhouse. I've run out of buttons, though. Now, that will be a fun shopping trip!

And here it is, all laid out in our tiny living room. So, there is a 2 inch seam allowance on each side, and the bottom will be hemmed (with scissors - gotta love felt!) up to the soil. So, the teepee will actually be a lot smaller than it looks here. It should comfortably fit two children inside. I think it might even fit three if I can talk my husband into having a third!
I'm almost finished cutting and pinning my fourth panel! Then I just have one more before teepee assembly begins! Stay tuned...

The tepee is really coming together nicely. My favorite parts, too, are the removeable flowers and vegetables. The vegetable signs are clever. I like the way you explained step by step and also explained how you made some changes to improve it.
ReplyDeleteThanks, Mom!
ReplyDelete